In a series of posts which I’m about to publish, I will demonstrate how to build a very simple web application using different languages and technologies, to give you a simple but realistic basis based on which compare them and pick the ones which suit you the most.
In this post which is the first among this series, we will see in a step by step fashion how to build the front-end of the application using Angular 2. The complete source code can be found here.
Step 1 – Create the Angular project
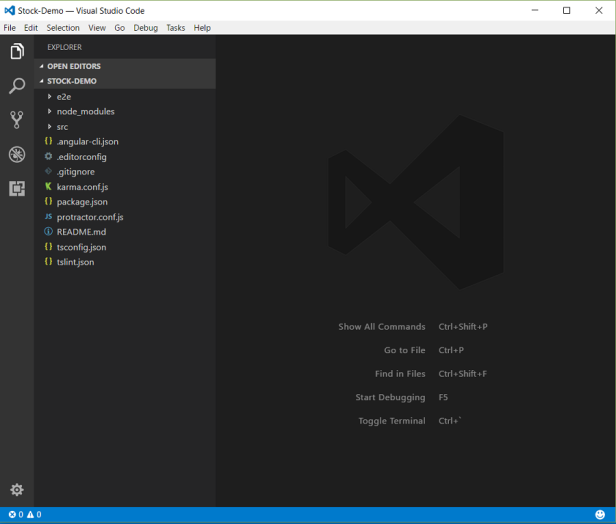
Although you can create an Angular project from the scratch, for many reasons, it’s recommended to use the Angular CLI to do so. After installing, the Angular CLI (and node before that if you haven’t installed it already), we create the project using the following command:
ng new Stock-Demo
After execution of this command, if you open the created folder in Visual Studio Code, which is my favorite IDE for js-based development and I will use in my tutorials, you will see something like this:
Note: If you execute any of the following commands in the terminal, show it in VSC using Ctrl + y, you can run your application with its default contents:
ng serve
or
npm start
You can see the website on http://localhost:4200/ by default.
Step 2- Creating the Module and Components Scaffolds
Each Angular application is composed of many Modules, Components, and other elements which we may cover some of them in this tutorial.
Let’s first create a module named StockItemsModule in the app folder under the src.
in order to do this, change the directory to the aforementioned directory and run this command:
ng g module stock-items
As you’ll see, this will create a folder called stock-items containing the file stock-items.module.ts which is our module.
Now we crate the component inside the newly created folder, i.e. stock-items like this:
ng g component stock-items-list
This command not only creates the component with the main building blocks of that component, it adds the reference to that component to our module.
We repeat the same to support the other CRUD operations like this:
ng g component stock-items-create
ng g component stock-items-update
ng g component stock-items-delete
ng g component stock-items-details
After all of these, our project should have this structure:
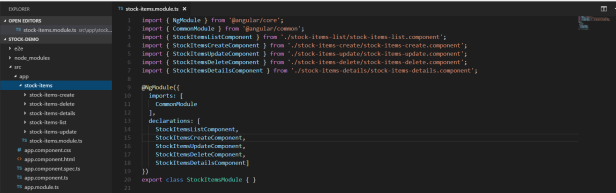
Note: I do not prefer the naming convention for the component folders provided by default, so normally I change these in reality into list, create, update, delete, and details. Plus, as a personal preference I change the name of components to reflect the action better, i.e., DeleteStockItemsComponent instead of StockItemsDeleteComponent for instance, however, here, I keep them as they are for the sake of simplicity.
Step 3- Creating the Api Service – JSON object version
Let’s recall that Agular is a front-end framework, i.e., whatever you do is just simply(!) about the front-end of your application. But, in every real application you need a sort of interaction with a back-end system which is responsible for some database operations, scheduled jobs, CPU-intensive tasks, etc. API-calls are the most commonly used way to enable such interactions.
For this tutorial I don’t want to mess with any sort of back-end systems so I just do all the operations on a local object which is an array of objects. So, we make a service which takes care of these interactions. I don’t want to call it a mock service, though it’s mocking the real communications, because there is a real counterpart out there for the term mock, which we will cover perhaps in another post.
To make the service, we change the directory to the app level, and create a service called JsonApiService in a folder called shared, like this:
ng g service shared/JsonApi
We add the following lines of code to this service:
json-api.service.ts:
import { Injectable } from '@angular/core';
import { Observable } from 'rxjs/Observable';
import { Http, Response } from '@angular/http';

import 'rxjs/add/operator/map';
import 'rxjs/add/operator/catch';
import 'rxjs/add/operator/delay';

const API_URL = ''; // Normally this comes from a config file

@Injectable()
export class JsonApiService {

  constructor(private _http: Http) { }

  getAll(url: string): Observable<any> {
    return this._http.get(url) // Normally the prefix of the URL comes from a config file
      .delay(100) // Just for demo purposes
      .map(this.extractData)
      .catch(this.handleError);
  }

  private extractData(res: Response) {
    const body = res.json();
    if (body) {
      return body.data || body;
    } else {
      return {};
    }
  }

  private handleError(error: any) {
    let errMsg = (error.message) ? error.message :
      error.status ? `${error.status} - ${error.statusText}` : 'Server error';
    console.error(errMsg); // log to console instead
    return Observable.throw(errMsg);
  }
}
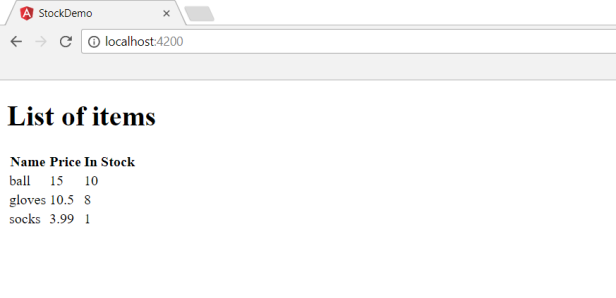
Step 4- Displaying the List of Items Fetched Using the API
Now that we can fetch the data, we should create the view which renders it. For the sake of brevity, here we just do the list view which is carried out through the StockItemsListComponent. So we add the following codes to do so:
stock-items-list.component.ts
import { Component, OnInit } from '@angular/core';
import { JsonApiService } from '../../shared/json-api.service';

const GET_URL = '../../assets/stock-items.json';

@Component({
  selector: 'app-stock-items-list',
  templateUrl: './stock-items-list.component.html',
  styleUrls: ['./stock-items-list.component.css']
})
export class StockItemsListComponent implements OnInit {

  items: any[];

  fetch(): any {
    this._jsonApiService.getAll(GET_URL)
      .subscribe(value => {
        this.items = value;
      }, error => console.log('this is the least we can do with this error: ' + error));
  }

  constructor(private _jsonApiService: JsonApiService) { }

  ngOnInit() {
    this.fetch();
  }

}
stock-items-list.component.html
<h1>List of items</h1>
<table>
  <tr>
    <th>Name</th>
    <th>Price</th>
    <th>In Stock</th>
  </tr>
  <tr *ngFor="let item of items">
    <td>{{item.name}}</td>
    <td>{{item.price}}</td>
    <td>{{item.instock}}</td>
  </tr>
</table>
The results will be as depicted below.